
Start with the size of square you want. Don't make them too small. These are 4 inch squares but you could use 3 inches or whatever. Cut two out of your background fabric and three out of your bow tie fabric.

Take one of your bow tie squares and fold it in half with the wrong sides together.

Position it on a background square matching the long side - with right sides facing.

Now lay a bow tie fabric on top of both of them, with right sides facing...

so that you have sandwiched the folded square.

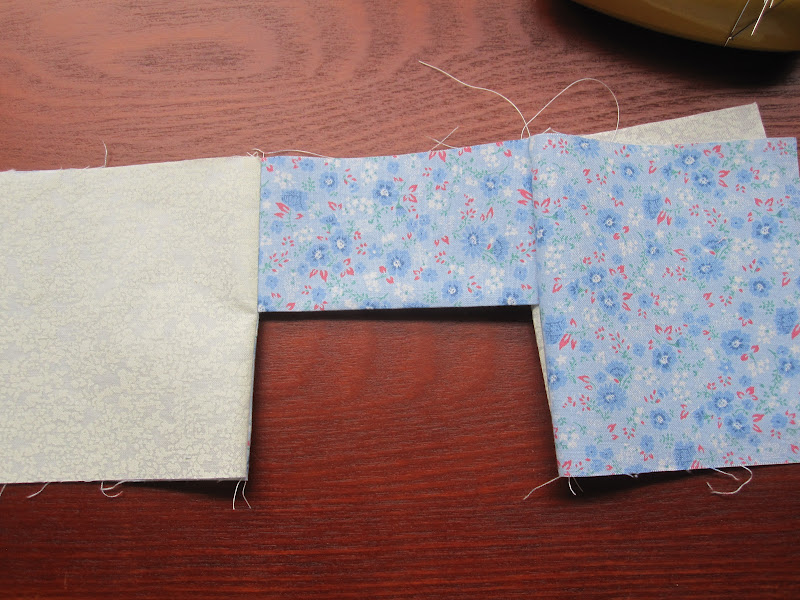
And now pin and sew down the seam at 1/4". I sewed with white thread so if you cannot see it, please click on the photo to make it bigger.

One third of the stitching is now done. Take this to the ironing board...

and fold back the two squares to iron the seam. It's not important to iron the folded square flat but if this happens, don't worry about it.

Now take the two other squares and sandwich the other side of the folded square between them but...

reversing the sides but keeping right sides facing each other.

As you can see, the background piece that already got sewn is folded back and now...

sew the seam once again with 1/4". Now two thirds of your sewing is done.
This is what your block should look like so far. Iron it once again as before. Someone once said it looks like a pair of pants. Notice that one side shows the background fabric and the other one shows the bow tie fabric.

Now take the middle square and open it up.

Match the two seams...

making sure that one seam goes one way while the other seam goes the opposite way. Pin them in place and then...

pull out the edges of the folded square.

Pin the folded square too. This helps to keep all the edges together.

One side being pinned.

Now do the same to the other side.

Pinning really does help.

Now it's ready to be sewn. Just remember to take out the pins before you sew. It does look wonky but have no fear...

it will work out. Just iron it and you're done.
 Some assembly line work.

If you have any questions, just email me. This one started out with 4 inch cut squares and so it ends up 7.5 inches.
Great tutorial. This is a neat technique....I used it for a table runner in green last year and arranged the bow ties in a wreath setting. Hope lots of readers will try it.
ReplyDeleteThanks Delores , that was a great tutorial and I will give it a try using your instructions .
ReplyDeleteThanks for this awesome tutorial. I hope you won't mind if I pin it to my Quilt & Sew board on Pinterest so that I have it for future reference.
ReplyDeleteSuch a simple block and it takes so many pictures to show how to! I know if I didn't know how to do it, I should quite easily follow your tutorial. I think I will do a few blocks and I am sure I will find a use for them somewhere!
ReplyDeleteThanks Dolores - I have never seen that done before!
ReplyDeleteСупер! Я видела эти блоки, но предположить не могла, что это так шьется. Теперь знаю. Спасибо!
ReplyDeleteVery well presented tutorial. I've never made one of these.
ReplyDeleteHi Dolores,
ReplyDeleteMany thanks for sharing this great tutorial - love the look of this quilt.
Happy weekend
Carolyn
Thak you for sharing. Will have to try it one day.
ReplyDeleteThank you so very much, Dolores! A well-done tutorial. I had one lone sample (using 2.5 inch blocks) I made some 20-25 years ago. Due to many moves over the years I lost it and any instructions, and only recently re-discovered just the block. I couldn't remember how to make it unless I de-constructed it, and I didn't want to do that. Now I can plan a quilt!
ReplyDelete