Sunday, July 29, 2012

Baby pinwheels and knitting

It's off the frame and the binding is finished. It's done. Now I guess I'll go serge some receiving blankets to go along with this.
 
I have a bit of knitting to do. I started this in April and other projects got in the way. I am now  hoping to finish it and then I will put another quilt on the frame. The sweater is for little Luc. The yarn is a bulky blend of acrylic and nylon by Red Heart called Artesano and the colour is purple mist. It is so nice and soft and since the size is a 2, he should fit into it this year and next year.

Wednesday, July 25, 2012

My own medal winners

Last Sunday three of my children (Ayla, Eric and Mark) competed (in the heat and humidity) in the Warrior Dash 2012 which took place in Barrie, about an hour north of here. It was not just a race but an endurance race complete with ski hills and obstacle courses - which they all finished. The Warrior Dash is held in various locations in Canada, the United States and Australia. The winner came in at just 20+ minutes whereas the norm was more like 40+ minutes. Eric competed with a swollen eye and right side of his face because he had an allergic reaction to what may have been a spider bite. Just before heading up to the race he went to a walk-in clinic to get it checked out and ended up with antihistamine medication. 
Note: This is a photo of a photo and that's why there is some glare.

Every once in a while my children do things like this. A couple of months ago (in April?) Ayla and her sister Maili, along with Maili's boyfriend Casey, competed in the 5/10 km race in Montreal.

Friday, July 20, 2012

It's here

I love art and I have a yellow wall that I have been wanting to make some tile quilts for but things just haven't worked out so far. My daughter had a coupon for a canvas work of art. I didn't really have any suitable photos but my daughter sent me some of her photos that she thought would work. The first ones were taken when she visited Guanajuato, Mexico in 2009.

There was this colourful one and I really liked it.

This one had colourful doors and wall.

A nice evening shot.

My favourite colour blue.

The peeling wall.

And this tile water fountain of a site that she worked on when she was in California.

It takes 4 to 6 weeks to make the canvas and get it delivered and I have been anxiously waiting. Walmart has similar canvas photos that you can get done and I'm sure the timeline is less. I don't know what the quality would be though. My daughter has already had two done by this company so she knows the quality is good. 
Well, yesterday my daughter got an email to say that FedEx will deliver it today so I was waiting. Here it is.


My daughter photoshopped out the signs on the door and the wall.

And here it is being held up by me against the yellow wall which is actually a much richer yellow than how this photo shows it.

Thank you Maili. You take great photos.

Wednesday, July 18, 2012

A finish, some progress and an update

I was determined to finish something yesterday and so, I finished knitting this baby hat.

There's a whole list of crocheted and knitted hats here. The one above is the Angled Preemie Hat. I don't think it's really a preemie size - more like a regular baby hat size. Way too much work and it took way too long since, after 20 rows of rib ( I only did 18), the pattern changed every 3 rows. I'm glad I did it and I now know how to make an I-cord. That's the long cord at the top of the hat that I knotted. So far, I have only repeated one pattern while making 8 hats. 

After much thought on how to quilt the border on this baby quilt, I was reminded by my quilting ladies Marg and Ann (the Champagne Quilters) that I could just use masking tape. It was a good suggestion because I am not a fan of any kind of marking on my quilts. I only use pencil or pencil crayon since the chemicals in wash-out or fade-out pens are unreliable. I don't know what they do to the fabric years down the road and I have heard about pen marks coming back after washing or in the heat or humidity - or just with time.

 I am not overly fond of masking tape because I tend to quilt too close to the tape and sometimes it gets sticky. In this case, the masking tape is the dollar store variety and so it has less 'stick' to it. Sometimes it doesn't even stay put for long. It may also be because of the heat and humidity in the air even though the a/c is on.

It's ready for a couple of turns. I decided to outline quilt all the pinwheels in the body of the quilt.


And this is what the Champagne Quilters are up to. We have decided to make some lap quilts for seniors and so we are using up some of the pre-printed panels that have been sitting in our stash for too many years. This is the third one and we have at least three more panels waiting to be paired up with backing.

If you are curious as to what other Canadians are up to this week, pop on over to The Needle and Thread Network. I'm also linking up to Esther's blog for WIP (Works In Progress.)

Tuesday, July 17, 2012

Finally on the frame

Well it's finally ready.


This is how it started out. The backing was pinned on first. I took this photo before I was finished pinning.

I forgot to take a shot of the backing before I put it on the frame so I photographed it from below.

Once I placed the quilt top on top of the backing, I found that the backing was just a bit too big so I cut some off two sides. This is closer to the true colour of the backing fabric.

It took a while but I finally re-pinned it after the cutting and stretched it smooth.

Here's the first side pinned.

And here's the whole quilt pinned and ready to be quilted.

This is the reason it took so long yesterday afternoon to get put on the frame. It's hard to pin while dancing and listening to Marco Antonio Solis  - especially to Tu Carcel. I don't understand a word of it but I love his music. At least this saves me time to find his videos on YouTube. All my favourites seem to be on this disk.

Monday, July 16, 2012

A little low key knitting

I have yarn - not as much as fabric, but still, there are bags and bags of yarn. A lot of it is chunky weight but there's a quite a bit of other stuff mixed in. I am not a knitter and only do it when the mood strikes or when I want to try something out. Right now I have a huge ball of baby coloured yarn and I am slowly using it up by making preemie hats - along with other yarns that come across my path. Recently, I purchased some double pointed needles and I am working with them. It saves me time so I don't have to sew a seam and I figure it may be more comfortable for the little one. Anyway, there are extra things that one can purchase if one wants to be a 'knitter' such as stitch holders and darning needles(I do have both of those) and stitch markers and row counters.

 Here's my low tech stitch marker indicating where the rows meet. You really can't see how big this ball of yarn is so I'll take another photo later with a regular ball and this one. I could probably get a baby afghan out of it.

And here's my fancy dancy row counter. I use any scrap of paper that's around and either a pen or pencil. This actually has the last two hats of counted rows on it. I don't feel I really need anything that's more in a regular knitters arsenal. I get by with what I have. Low tech, low key, it works for me.

I didn't get around to putting the baby quilt on the frame yet but hopefully, today. I may use some masking tape as a guide to the quilting and if I do, you can see my low key, low tech quilting aid.

Thursday, July 12, 2012

Next up

Well, I finally put the borders on this baby quilt and tomorrow I will find a backing and get it on the frame. Tonight I will be quilting with the Champagne Quilters. We are using up some of our stash and making lap quilts. We found some pre-printed panels and that's what we are working on at the moment.

 It's funny, but I wasn't all that keen on the quilt before but I really like it now that the borders are on. I went with a paler blue for the outside border. There is this colour in the blocks. The other blue was a tad darker but it just didn't feel quite right.

I love the colour of my geraniums. They are just on the back deck and I can see them whenever I am in the kitchen.

The bluejays were a bit loud early this morning. 

The sun was in the way and that's why these photos are so dull. Click on them so you can see them a bit better. That is a pear in the tree. We didn't get many last year and it looks like there are even fewer this year. The squirrels and raccoons like them and I suppose the birds do too but there really aren't many on this tree. Perhaps it's too old or needs pruning.

Tuesday, July 10, 2012

Another baby quilt

Friends of ours are going to become first-time grandparents in September and since the baby shower is in August, I figured I should get moving on finishing up this little baby quilt.

I have shown this before - in a post I did way back in February of this year. I mentioned then that I had wanted to try out the block. It was a freebie on Connecting Threads website and you can find it HERE. I had some light blue fabric given to me by Mary-Frances and a pale blue fat quarter that had the word 'Baby' on it. I figured I would just get the quilt done and put it away for some future baby. Well, apparently, it will be a boy and now is the time to finish this.

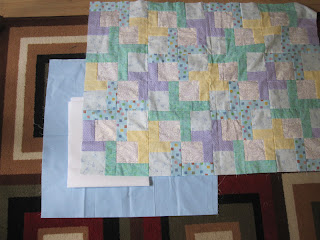
This is the border treatment I am planning. I have not yet measured the light blue fabric but I am hoping that there is enough there. The fabric is doubled in the photo. I am not keen on going out to purchase more fabric since I want to use up what I have. The white in the photo is really interfacing. I was in a hurry just to get this photo done so I could see what it would look like and the interfacing was a handy white to use. I will, of course, be using white broadcloth.

I have added two more hats to my preemie collection bringing the total to seven. The one on right was done last night with double-pointed needles and I have Ulla to thank for it. I had never used double-pointed needles before and she sent me a link to a YouTube video showing just how easy it was. In the video, one knits in the beginning tail of yarn so once one finishes knitting the hat, one need only to weave in the ending tail. Now I have to go look for more free patterns on the internet. I do like "free."

Once again, I will be linking up with The Needle and Thread Network. If you are in dire need of inspiration or would like to see what other Canadian bloggers doing out there, go take a look.

Thursday, July 5, 2012

3-D Bow Tie Tutorial

I do hope you can follow these instructions. It's not a hard block to make and there is only the initial cutting of squares to do. The rest is sewing and ironing.

Start with the size of square you want. Don't make them too small. These are 4 inch squares but you could use 3 inches or whatever. Cut two out of your background fabric and three out of your bow tie fabric.

Take one of your bow tie squares and fold it in half with the wrong sides together.

Position it on a background square matching the long side - with right sides facing.

 Now lay a bow tie fabric on top of both of them, with right sides facing...

so that you have sandwiched the folded square.

 And now pin and sew down the seam at 1/4". I sewed with white thread so if you cannot see it, please click on the photo to make it bigger.

One third of the stitching is now done. Take this to the ironing board...

and fold back the two squares to iron the seam. It's not important to iron the folded square flat but if this happens, don't worry about it.

Now take the two other squares and sandwich the other side of the folded square between them but...

reversing the sides but keeping right sides facing each other.

As you can see, the background piece that already got sewn is folded back and now...

sew the seam once again with 1/4". Now two thirds of your sewing is done.

 This is what your block should look like so far. Iron it once again as before. Someone once said it looks like a pair of pants. Notice that one side shows the background fabric and the other one shows the bow tie fabric.

Now take the middle square and open it up.

Match the two seams...

making sure that one seam goes one way while the other seam goes the opposite way. Pin them in place and then...

pull out the edges of the folded square.

Pin the folded square too. This helps to keep all the edges together.

One side being pinned.

Now do the same to the other side.

 Pinning really does help.

Now it's ready to be sewn. Just remember to take out the pins before you sew. It does look wonky but have no fear...

it will work out. Just iron it and you're done.

 Some assembly line work.

If you have any questions, just email me. This one started out with 4 inch cut squares and so it ends up 7.5 inches.